可观测性快速入门
本教程将向您展示如何将应用程序追踪到 LangSmith,帮助您快速上手使用我们的可观测性 SDK。
如果您已经熟悉可观测性SDK,或者有兴趣追踪不仅仅是LLM调用的内容,可以跳转到下一步骤部分, 或查看操操作指南。
追踪 LangChain 或 LangGraph 应用程序
1. 安装依赖项
- Python
- TypeScript
pip install -U langsmith openai
yarn add langsmith openai
2. 创建一个API密钥
要创建API密钥,请前往 LangSmith 设置页面,然后点击创建API密钥。
3. 设置你的环境
- Shell
export LANGSMITH_TRACING=true
export LANGSMITH_API_KEY="<your-langsmith-api-key>"
# The example uses OpenAI, but it's not necessary if your code uses another LLM provider
export OPENAI_API_KEY="<your-openai-api-key>"
4. 定义你的应用程序
我们将为本教程对一个简单的 RAG 应用程序进行设置,但如果你愿意,也可以使用你自己的代码 - 只要确保它包含一个 LLM 调用!
应用程序代码
- Python
- TypeScript
from openai import OpenAI

openai_client = OpenAI()

# This is the retriever we will use in RAG
# This is mocked out, but it could be anything we want
def retriever(query: str):
    results = ["Harrison worked at Kensho"]
    return results

# This is the end-to-end RAG chain.
# It does a retrieval step then calls OpenAI
def rag(question):
    docs = retriever(question)
    system_message = """Answer the users question using only the provided information below:

    {docs}""".format(docs="\n".join(docs))

    return openai_client.chat.completions.create(
        messages=[
            {"role": "system", "content": system_message},
            {"role": "user", "content": question},
        ],
        model="gpt-4o-mini",
    )
import { OpenAI } from "openai";

const openAIClient = new OpenAI();

// This is the retriever we will use in RAG
// This is mocked out, but it could be anything we want
async function retriever(query: string) {
  return ["This is a document"];
}

// This is the end-to-end RAG chain.
// It does a retrieval step then calls OpenAI
async function rag(question: string) {
  const docs = await retriever(question);

  const systemMessage =
    "Answer the users question using only the provided information below:\n\n" +
    docs.join("\n");

  return await openAIClient.chat.completions.create({
    messages: [
      { role: "system", content: systemMessage },
      { role: "user", content: question },
    ],
    model: "gpt-4o-mini",
  });
}
5. 跟踪 OpenAI 调用
您可能想要追踪的第一件事是所有的 OpenAI 调用。LangSmith 通过 wrap_openai(Python)或 wrapOpenAI(TypeScript)包装器使这变得简单。
您所要做的就是修改代码,使用封装的客户端而不是直接使用 OpenAI 客户端。
- Python
- TypeScript
from openai import OpenAI
from langsmith.wrappers import wrap_openai

openai_client = wrap_openai(OpenAI())

# This is the retriever we will use in RAG
# This is mocked out, but it could be anything we want
def retriever(query: str):
    results = ["Harrison worked at Kensho"]
    return results

# This is the end-to-end RAG chain.
# It does a retrieval step then calls OpenAI
def rag(question):
    docs = retriever(question)
    system_message = """Answer the users question using only the provided information below:

    {docs}""".format(docs="\n".join(docs))

    return openai_client.chat.completions.create(
        messages=[
            {"role": "system", "content": system_message},
            {"role": "user", "content": question},
        ],
        model="gpt-4o-mini",
    )
import { OpenAI } from "openai";
import { wrapOpenAI } from "langsmith/wrappers";

const openAIClient = wrapOpenAI(new OpenAI());

// This is the retriever we will use in RAG
// This is mocked out, but it could be anything we want
async function retriever(query: string) {
  return ["This is a document"];
}

// This is the end-to-end RAG chain.
// It does a retrieval step then calls OpenAI
async function rag(question: string) {
  const docs = await retriever(question);

  const systemMessage =
    "Answer the users question using only the provided information below:\n\n" +
    docs.join("\n");

  return await openAIClient.chat.completions.create({
    messages: [
      { role: "system", content: systemMessage },
      { role: "user", content: question },
    ],
    model: "gpt-4o-mini",
  });
}
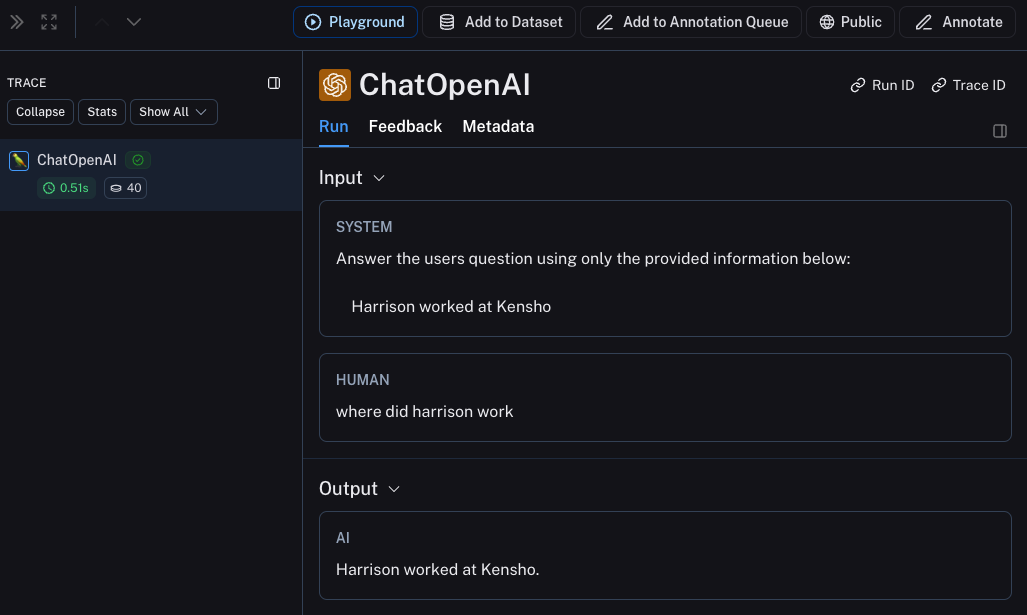
现在当你像下面这样调用你的应用程序时:
rag("where did harrison work")
这将仅在 LangSmith 的默认跟踪项目中生成 OpenAI 调用的跟踪记录。它应该看起来像 这个。
6. 跟踪整个应用程序
您也可以使用 [traceable] 装饰器(Python 或 TypeScript)来跟踪整个应用程序,而不仅仅是 LLM 调用。
- Python
- TypeScript
from openai import OpenAI
from langsmith import traceable
from langsmith.wrappers import wrap_openai

openai_client = wrap_openai(OpenAI())

def retriever(query: str):
    results = ["Harrison worked at Kensho"]
    return results

@traceable
def rag(question):
    docs = retriever(question)
    system_message = """Answer the users question using only the provided information below:

    {docs}""".format(docs="\n".join(docs))

    return openai_client.chat.completions.create(
        messages=[
            {"role": "system", "content": system_message},
            {"role": "user", "content": question},
        ],
        model="gpt-4o-mini",
    )
import { OpenAI } from "openai";
import { traceable } from "langsmith/traceable";
import { wrapOpenAI } from "langsmith/wrappers";

const openAIClient = wrapOpenAI(new OpenAI());

async function retriever(query: string) {
  return ["This is a document"];
}

const rag = traceable(async function rag(question: string) {
  const docs = await retriever(question);

  const systemMessage =
    "Answer the users question using only the provided information below:\n\n" +
    docs.join("\n");

  return await openAIClient.chat.completions.create({
    messages: [
      { role: "system", content: systemMessage },
      { role: "user", content: question },
    ],
    model: "gpt-4o-mini",
  });
});
现在如果你以如下方式调用你的应用程序:
rag("where did harrison work")
这将生成整个管道的跟踪信息(其中OpenAI调用作为子运行),它应该看起来像 这个

下一步
恭喜!如果你已经走到这一步,你已经在 LangSmith 上成为可观测性专家的路上了。以下是一些你可以进一步探索的主题:
或者您可以访问教程页面,了解有关使用 LangSmith 可观察性可以执行的所有操作的信息。
如果您更喜欢视频教程,请查看 LangSmith 课程入门中的 追踪基础视频。